This is just a quick summary of the procedure which seems the safest to get the OSG library compiled and installed properly to develop with MS Visual Studio. Installing OSG is highly simplified if you work under Linux tough, so give it a try if you can’t manage to have it to work under Windows ;) ! NB: If you don’t have MS Visual Studio, download and install MS Visual Studio Express
Installation of the OSG library under MS Windows
- Install CMake (http://www.cmake.org).
- Download the source code zip of OSG
- Download the Win32 binary dependency libraries for OSG and place the files in a folder which can remain (e.g. C:/Program Files/OpenSceneGraph/3rd-party). Using SVN is the more appropriate to do so.
- To compile OSG:
- Read the instructions.
- Follow the instructions.
- To have it simpler:
- Uncompress the OSG zip in a place where it can stay (i.e. Desktop is not a good idea)
- In cmake, setup the bin install directory to C:/Program Files/OpenSceneGraph
- In cmake, make sure when configuring that you select the version of Visual Studio that you have.
- In cmake, clic configure maybe twice to ensure all is green. Clic ’Ok’ to generate the projects.
- In Visual Studio, compile the Release version.
- In fact, it does not take too long to compile (<20 minutes). Build the INSTALL project when done.
- Download and uncompress the OSG sample data at a place where it can remain (e.g. C:/Program Files/OpenSceneGraph/OpenSceneGraph-Data)
- Setup the environment variable PATH (or Path) of your system to contain the path to where the binaries of OSG have been installed: it should be C:/Program Files/OpenSceneGraph/bin. Setup the other OSG_ environment variables as specified. Log out/log in again.
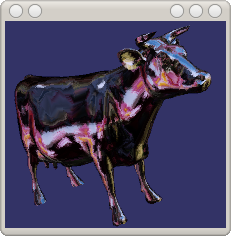
- Test the OSG viewer: open the command line (cmd), navigate to where you have the sample data set (or make sure the OSG_FILE_PATH environment variable is set) and execute ’osgviewer cow.osg’. You should see the cow! If so, you are done with the installation of OSG!

- The famous OSG cow
- Execute ’osgviewer cow.osg’ to test your OSG installation.
Making a test program for OSG
To make your own program;
- I made a little CMake project which should work for Linux and Windows (Uncompress and read the README):
- run cmake in the osgTest directory (ccmake . in a linux console). This should produce a Makefile (linux) or a Visual Studio project (Windows)
- Compile the program (e.g. with make). If you do not want to use CMake;
- It is a bad idea to copy an existing MS Visual Studio dsp project from OSG installation because they are all linked into the global library solution, and even a physical copy of the .dsp files keeps references to the library and may alter the installation of OSG.
- Better create a blank new console application, specifying the OSG include and lib directories and linking with the osg libraries and the osg dependency libraries. An example of such MS Visual Studio solution can be found here:
Programming using OSG
- First make sure you understand what a scene graph is and how it works
- There are tutorials online everywhere (e.g. wikipedia, gamedev.net, etc.)
- Exploratories with Java
- Second, get used to OSG by testing the examples, tutorials and by reading
- the OSG documentation
- the OSG Quick Start Guide.
- A Short Introduction to the Basic Principles of the Open Scene Graph, by Leandro Motta Barros.
- Third, use the osg reference guides when coding

